Printable Versions (Pdf)
Background
Today caustic soda is normally used in soap making.
However, in some countries, caustic soda is difficult or too expensive to obtain. The aim here was to try and use old pioneering methods from the Western World, that use substances which are easily found or made in most parts of the world.
These materials were originally prepared and printed as a booklet, at the request of Christians in Burma, to help in situations where normal supplies of soap are not readily available; and where caustic soda is hard to come by. This information was needed because soap can be powerful in stopping the spread of certain diseases.
As some of the steps in traditional soap making, require repeated practice to get right, carrying out some of these methods using only small amounts of the needed things, will help people learn, without wastage.
This is especially true for people trying to make soap for the first time who do not have someone to show them how to do it. Diagrams and lengthy explanations have therefore been given to help people gain a better understanding.
English as a second language
Owing to the fact that some of the people using these materials, will only speak English as a second language, when ever possible an attempt has been made to keep the language of the rest of these materials as understandable as possible. Other readers are asked to bear with any phrasing or repetition which would other-wise seem unnecessary.
Peter Donkor's Book
People wishing to make soap in larger quantities than just for a few families at a time, would find a copy of the following book very useful:
Small Scale Soap Making, a Handbook.
Peter Donkor, I T Publications Published London, England 1986.
Here is an Amazon link for the book: http://www.amazon.com/exec/obidos/ASIN/0946688370
It also might be worth making contact with the University of Science and Technology (UST) in Ghana:-
University of Science & Technology, University Post Office, Kumasi, Ghana West Africa.
General E-mail Address: ustlib@ust.gn.apc.org
Tel: + 233 51 530, + 233 51 5351, + 233 51 5352...
UST Ghana URL (http://www.uta.fi/%7Ecsfraw/ghana/edu/ust.html)
PLEASE READ:- WARNING
Some of the chemicals used in soap making can be harmful. People experimenting with the methods and information given in these materials, or trying soaps made from the information given in these materials, do so at their own risk. There are no implied or other under-takings given in these materials.
References to 'medicated', or the nature of any soap's effect on human beings is entirely conditional upon each individual's allergies and other health considerations.
Poorly made soap can 'burn' your skin. The production of safe soap takes time and patience, and comes with the resulting experience.
When making soap NEVER use aluminium or tin things - AT ALL!
Aliminium and tin are very badly corroded by the caustic chemical used
in soap making.
SOURCES
These materials, have been prepared from information in many many soap making books, which have some mention of old pioneering methods which were used up to the end of last century in America, Australia, Canada, and New Zealand.
Although experiments were done, the writer of these materials, has not met anyone who was still using these Non-caustic-soda methods on a regular basis.
However, many of these techniques are being used in some African countries at present.
Before going into the detail of actually making soap, there is an information section which looks at the methods and other things in some detail.
main things needed to make soap
There are only five main things needed to make soap. They are:
1) White (wood) ash,
2) Rain or Spring Water
3) Animal fats (grease)
4) Plant oils,
5) Salt.
In getting the fat ready, sometimes lemon juice or vinegar, and potatoes or rice are needed.
You will need some of the following objects:
Plastic buckets or big fired clay jars or pots, and large cast iron or stainless steel boiling pots can be used.
NEVER use aluminium or tin things - AT ALL!
Aliminium and tin are very badly corroded by the caustic chemical used
in soap making.
- Wooden spoons or stirring sticks will also be needed. (Sometimes an old broom handle does the job well).
- Something in which to set the new soap will be needed, as shown in the diagrams of these materials.
Clean cloths or rags will also be needed to filter out unwanted things from some liquids.
Soap making uses a `caustic solution' known as "Lye Water". When available, Caustic Soda is used. Here we will make Lye Water out of certain wood ashes and "soft water".
1) White Ashes
Dried palm branches, dried out banana peels, cocoa pods, kapok tree wood, oak wood, (or for really white soap, apple tree wood) make the best lye ashes. Ordinary wood used in cooking fires will do.
Whatever wood is used, it should be burned in a very hot fire to make very white ashes.
When cold, these are stored in a covered plastic bucket or wooden barrel, or stainless steel container. If these are not available, a clay pot-jar which has been fired in a pottery making kiln (not just dried in the sun).
A wooden drum or barrel which has a tap is best.
2) Soft Water
Water from a spring or from showers of rain is called "soft water", because it does not have metallic or acidic chemicals in it.
This makes it useful for soap making, as there are no other chemicals in it which would get in the way of making soap.
`Ordinary' bore, well, or river water can be used for making soap, but this will sometimes need to have a "washing soda" or "baking soda" in added to it. Otherwise some of the chemicals in the water will get in the way of making the soap.
If you are using `ordinary' water and you want to test it to see if some soda needs to be added, simply try to make soap bubble up (foam) in it. If the soap easily foams up, the water is probably ok as it is. If not, try adding a little bit of soda at a time stirring it to make it disappear, until the water will foam the soap up.
Then add the same amount of soda to the same amounts of the water that you wish to use to make the soap. For example, if you were testing a 1/4 (a quarter) of a bucket of water, and you ended up needing 1/8 (an eighth) of a cup of soda, then you would need 4/8 ( or 1/2-half) a cup of soda for a full bucket of 'ordinary' water.
However you have got it, store the "soft water" in covered wooden, plastic, or stainless steel buckets or containers. (Again, a clay-jar as described above can be used if needed.)
"SAFE" CONTAINERS
Any of the types of containers, buckets, barrels or jars described in the White Ashes, Soft Water, or Needed Objects sections are called "safe containers".
This phrase "Safe Containers" is often used when making soap.
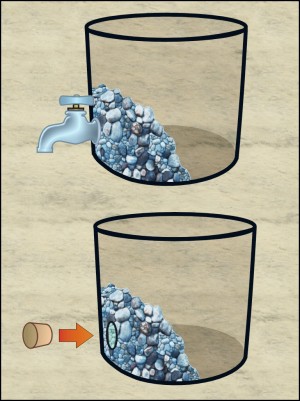
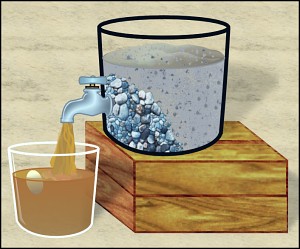
If you are going to use a large barrel or drum to make the lye water in, and it has a tap or hole at the right, place some kind of filter on the inside of the barrel around the opening (as shown in the diagrams).
Fill the barrel with white ashes to about four inches (10 cm or O.1 metre) below the top.
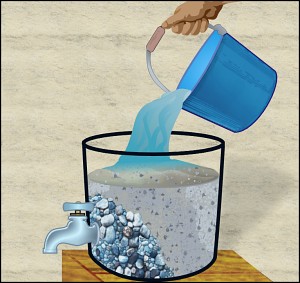
Boil half (1/2) a bucket full of soft water (about 10 pints or six litre), and pour over the ashes.
Slowly add more cold soft water until liquid drips out of the barrel. Close the tap or block the hole.
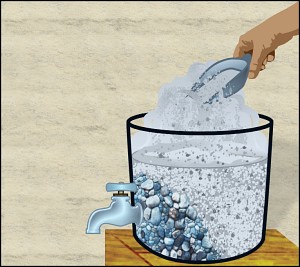
Add more ashes to top the barrel up again, and more soft water. Do not add so much water that the ashes swim.
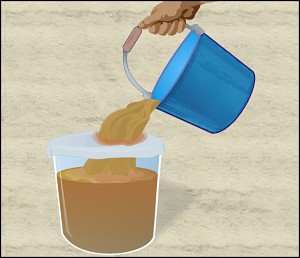
Leave to stand for four or more hours (or over night if you have the time). Later pour the brownish lye water into a plastic or other "safe" container(s). Then pour back through the ashes again. Let the lye water drip into "safe" containers.
When the brown lye water stops coming out of the barrel, or ash container, then pour four to five pints (2� to three litre) of soft water through the ashes, collecting the lye which comes out in a separate "safe container" (as this lye may be weaker than the first lot).
Repeat this using two to three pints (one to two litre) of soft water, until no more brown liquid comes out of the ashes.
Either put the lye into "safe" bottles, or cover the "safe containers" which it is in. Dig the ashes into the vegetable garden.
KEEP LYE WATER AWAY FROM CHILDREN.
LYE WATER IS DANGEROUS !lye water strength
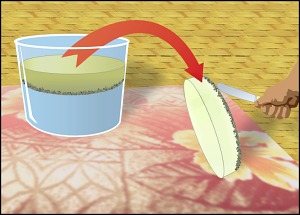
If a freshly laid (hen's) egg, or potato, will float just below half way, or a chicken feather starts to dissolve in it, then the lye water is at the right strength.
If the egg will not float, then the lye water could be boiled down if you wanted it to be stronger.
If the egg seems to pop up too far, add a little bit of soft water (a cup at a time) stirring the lye water, until the egg floats so that its head pops up.
3. Animal Fat (grease)
The fat of most animals can be used in the making of soap.
Grease made from beef fat, makes the best soap. Beef fat is taken from a cow, calf, steer, or bull cow, or bullock.
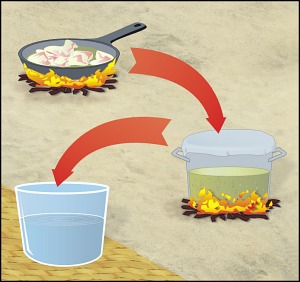
Once the meat of the animal has been cut away, the fat is chopped into bits and placed in a cast iron frying pan or a (not too deep) wide pot.
Melted slowly over a low heat, each pound (450 gm or 0.450 kg) produces about one cup of useful grease.
Pour the melted grease through straining cloths (cheese-cloth).
The grease must now be "washed".
Add an equal amount of water, and bring to the boil, take off the heat, and add one quarter (1/4) as much cold water. Leave the water and grease to cool. When the fat has hardened, scrape the dirty stuff off the right. If the fat still looks dirty, "wash" it until clean.
On the last washing use twice as much water, and before boiling add one table spoon of salt (80 ml salt crystals).
If fat which has been used for cooking is to be used for soap making, then you may need to get rid of smells (see next section).
Washed clean smelling fat, can be stored in a cool airy place for a few weeks before being made into soap.
Smelly Fat - purifying
For each cup of smelly fat, add two table spoons of vinegar or lemon juice in half a cup of water and boil.
Any fat which smells "off" should be treated in this way.
Another method for treating smelly fat, when lemon juice or vinegar is not available, is to use sour milk.
Melt the fat, and to each cup of fat add one cup of sour milk, and cook. When cooked, add cold water as before and let cool.
Cooking potatoes or rice in fat can also help, one medium sized potato for each three cups of melted fat. Strain off fat when cooked and pour in cold water as before.
All these ways will help to purify fat if it is rancid or smelly.
If the fat that you wish to use is discoloured. Potassium permang-anate (if you can get some) will help to "clean" it.
Dissolve a few crystals in two cups of soft water added to two cups of discoloured melted fat.
The cleaned fat will harden as it cools and be able to be taken off the top of the liquid. [Potassium permanganate is purple in colour and is sometimes called Kondies Crystals. It should not cost much at all.]
4) Plant Oils
Oils may sometimes be used instead of either some or all of the animal fats, described later on as being, used in making soap. (Please read the section below on Fats & Oils & Caustic Soda).
Mineral oils (like the ones used in cars, motors, or engines) are not ok. You can not use mineral oils in soap making
Any oils which are good for eating or cooking, can be used in making soap.
One of the best is said to be Coconut oil. Groundnut, Shea butter, Cocoa butter, Sun flower and many other vegetable oils are also used .
fats & oils & caustic soda
Lye water made from wood ashes or pot ash powder, is not as easy to work with, as lye made from caustic soda.
Caustic Soda manages to work both oils and fats into soap (saponification) quite quickly and with little trouble. However, the amounts of caustic soda and grease or oil, have to be very carefully measured.
As said earlier, caustic soda is not able to be got in some places for one reason or another.
The draw back of using wood ash lye, is that it may not always work with all the oils that caustic soda is able to turn into soap.
Coconut oil has been used successfully with wood ash lye, but often needs a lot of beef tallow grease with it.
It will take some trial and error with small amounts of oils and lye to see which of the oils you have available to you, that you can use with wood ash lye.
In many cases you will at least be able to make a soft liquid soap, using various oils, even if you can not make hard bar soaps.
Sometimes extra boiling will help, but there would be a limit to how much boiling was really worth while doing.
This table is from Peter Donkor's book 'Small Scale Soap Making' (Page 70)
If You Want to Print this Information
TYPES OF SOAP MADE BY THESE OILS & FATS: | |||||
|---|---|---|---|---|---|
Oil |
Texture |
Lathering (Bubbles) |
Cleaning |
Effect On Skin |
Uses |
| Neem | Fairly Soft | More & Stable | Good | Antiseptic | Washing Bathing |
| Coconut | Very Hard | Plenty & Fairly Stable | Very Good | No Effect | Washing Bathing & Shaving |
| Tallow | Hard | More & Stable | Very Good | No Effect | Washing Bathing & Shaving |
| Palm Oil | Hard | Less Stable | Very Good | No Effect | Washing Bathing |
| Palm Kernal | Very Hard | Plenty & Fairly Stable | Good | No Effect | Washing Bathing |
| Ground (pea)Nut | Soft | Less & Stable | Very Good | No Effect | Washing Bathing |
| Shea Butter | Fairly Hard | Fairly Good | Good | No Effect | Washing Bathing |
| Cocoa Butter | Hard | Good | Good | No Effect | Washing Bathing |
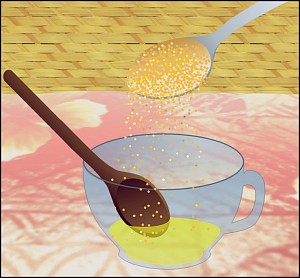
5) Salt
"Common" salt is used in making soap.
Any salt made out of sea water (or from some stagnant lakes), or dug out of the ground, which is known to be safe to eat with food, should be ok for soap making.
general background information (overview)
(The following information is to explain the basic steps of soap making. Each of the seven points below are described more fully in this section, then later on the General Method of Soap Making is gone through in depth.)
Simple hard soap making has seven main steps to it:
- Getting the right mixture of lye and grease, called "proving".
- "Boiling down" -removing unwanted water, and checking for what is called "doneness".
- Treating with salt to remove water, impurities, and glycerine, a process called "graining".
- Adding colourings and or perfumes.
- Pouring into moulds, called "setting".
- Breaking the "green" soap out of the moulds and splitting it into finished sizes.
- Drying and airing the "green" soap.
Freshly made soap is called "green soap". It is not green in colour. But is dangerous to touch until dried and aired for a few weeks.
Proving (Information A)
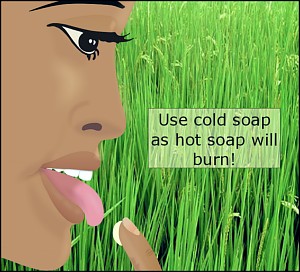
Getting the right mixture of grease and lye is perhaps the most important step of soap making. If too much lye is left in the soap, the soap will be able to "burn" the skin. Also,the soap may not "set" properly. Too much grease causes its own problems as well.
Three different main ways of "proving" the soap are explained later on (Proving). Three, because some people will find one way better, while others will find another one works better for them.
In "proving" the soap, either one or more of the different ways can be used. Only one has to be used not all of the different ways have to be used. When making soap for the first few times however, you may like to try them all out.
Mixing Greases
If you are wanting to mix beef tallow grease with another fat grease, like mutton (sheep) or lard (pig), it is better to only replace one fifth (1/5th) of the beef tallow grease, with the other grease.
For example, if you were going to use four pints of melted beef tallow grease, you could use one pint of another kind of grease mixed in. This would probably be useful as a clothes washing soap. Background Information
Doneness - (Information B)
After having "proved" the soap mixture, an eye is kept on when the heating has got rid of the water that is not needed.
During "boiling down", the mixture rises up the sides of the pot with many small bubbles (called foaming or frothing).
This is the stage when water is going out of the mixture while the heat is kept going. When the foaming starts to slow down, the froth will go towards the right of the pot.
Large white round bubbles will appear.
If you are only making "soft" liquid soap, now would be the time to store it.Background Information
Graining and Reworking - (Information C)
When aiming to make a "hard" soap, salt is added at this point. Any sort of eating salt like ones made from sea water should do.
Salting the soap mixture, makes the soap rise to the top, often looking quite "grainy"- like sand. So this step is sometimes called "graining".
This step makes a good solid soap for washing clothes. But it also removes some of the things which make soap nice and safer for people to use on themselves.
Soaps which are good for people to use are called "toilet" soaps. However, clothes soaps can be used by people -if properly "proved".
To make a "grained" soap more useful for humans, it is "reworked". This involves remelting the "green" soap, and adding some more grease and or oils and lye.
The same "proving" and checking for "doneness", steps are followed as for simple soap making, without "graining" adding salt. Background Information
colourings and perfumes - (Information D)
There are perfumes and colourings which may be bought as powders or as liquids. These are added at the last "remelt" before pouring the soap into the moulds to "set" (step 5).
These materials explains a method of using flowers to put perfume right into the beef grease before the soap is actually made This is a cheaper way of doing it.
If you are using liquid perfumes, they will sometimes be affected by heat, so add them well after the soap has been remelted, and stir in gently before the soap goes hard again.
When trying out new perfumes, first test them on a small amount of melted soap, so that you can see how much will be needed in all.
Perfumes will leave the soap and go into the air after a time, so use a bit more perfume than you might think you will need, when you are making the soap. Please read the perfuming section later in the booklet.
Soap made from wood ash lye, is a bit brownish. Apple wood ash makes a whiter soap. As does using caustic soda instead of ash lye.
Simple colouring powders are described later on as well. Background Information
pouring & "setting" (Information E)
Before starting to make soap you will need to have made some shaped-moulds for the melted soap to "set" and harden in.
You can either have one large block, or many small moulds. A plastic bucket, wet wooden troughs, or small greased wooden moulds can be used. Background Information
Splitting (Information F)
When hardened, the soap is "broken out" of the moulds, and if necessary "split" down to useful sizes with a wire or fine cord.
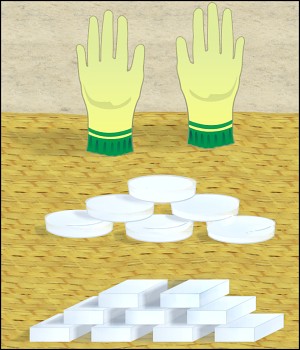
Either wear rubber gloves, or put lots of grease on your hands while handling the "green" soap. Background Information
drying (information G)
After all this the soap should not be used until it has been aired for about one month or so It should be stacked so that air can get around it, but without sunlight or water being able to get near it.
After it has "dried", you can polish it with a clean cloth if you wish. Background Information
SOAP MAKING METHODS
As shown in the chart above, the methods given here, can make one of three kinds of soap:
- Soft liquid soap
- Hard clothes washing soap ("laundry soap")
- Hard soap for washing people ("toilet" soap).
It depends on the quality of the things used to make soap, and how far the method is followed, as to which kind of soap ends up being made.
Soap Making
Three large cast iron or stainless steel pots are needed The largest pot has to be twice the size of the next biggest one.
In one of the smaller pots melt the amount of fat that you want to use, over a hot fire. In the other of the smaller pots heat lye water. To give you an idea of how much lye water you will need overall, twelve pounds of clean rendered beef tallow (4.4 kg or -13 pints or nearly thirty cups of melted tallow) needs about 20 gallons of lye water (96 litre =160 pints) to completely make soap.
You will not use all of this up at once. Approx one pint of melted grease reacts with about 12 pints lye water (at egg floating strength). Many things can upset this balance. That is what the "proving" methods help to sort out.
(If you are going to "re-work" and add oils or fats at the end of the method, you will have to allow for about a 1/5th more lye water for that as well.)
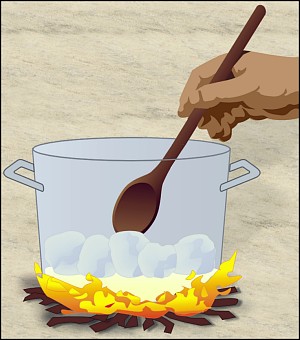
When melting the grease, put half an inch (1cm) of water to stop it burning in the pot at the start.
If you are able to measure the temperatures of the fats and lye that you are mixing at the beginning of soap making, then this information may help:
If You Want to Print this Information
Mixing Temperatures F° / C° | ||
|---|---|---|
| Fat Type | Fat Temp | Lye Temp |
| Treated/
Rancid Fat | 97-100 F° | 75-80 F° |
| 36.1-37.8 C° | 23.9-26.6 C° | |
| Sweet Lard /Soft Fat | 80-85 F° | 70-75 F° |
| 26.6-29.4 C° | 21.2-23.8 C° | |
| 1/2 Lard & 1/2 Tallow | 100-110 F° | 80-85 F° |
| 37.7-43.3 C° | 26.6-29.4 C° | |
| 100% (Beef) Tallow | 120-130 F° | 90-95 F° |
| 48.8-54.4 C° | 32.2-35.0 C° | |
Making the Soap
When ready, put the big Pot on the fire and spoon into it one fourth (¼) of the melted grease. On big jobs, another person should pour in one quarter (¼) of the hot lye water, while the first person stirs the mixture with a wooden stirrer.
Continue to add lye and grease, one person after the other, while stirring very well. Keep heating the mixture. The liquid will become stringy and muddy-looking. Continue to add lye water until the mixture looks quite clear, and not so muddy.
If a thick scum of grease forms on top, more lye is needed. If
the soap mixture does not thicken, and no scum appears, more grease
is needed.
If there is a strong thin white streak against brown, then more
lye is needed.
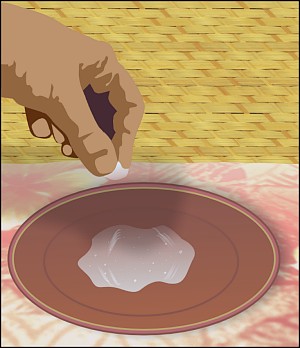
Some mixture dropped on a smooth glass or China plate, will not split up in to oil and water, but will stay the same. If this does not happen, keep stirring for some time If it has -then add more lye until all the fats or oil disappear.
The mixture should eventually look like cream or light caramel or light brown rice. Now the mixture is tested by a method called "proving".
"PROVING"
There are three main methods for "proving" given here, along with one advanced technique. Although only one needs to be used, using them all is a good idea when making soap for the first few times.
- Method A knife/plate
- Method B spoon/plate
- Method C fingers/plate (Ribbon Test)
- "Taste"
Proving Method A
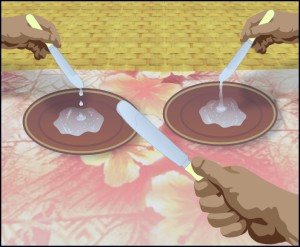 Take a clean knife. Lift some soap from the pot on the knife and
hold it over a cold plate. If the soap turns whitish and falls
from the knife in short pieces, there is too much lye - add more
grease (or oil if you are reworking the "green" soap).
Take a clean knife. Lift some soap from the pot on the knife and
hold it over a cold plate. If the soap turns whitish and falls
from the knife in short pieces, there is too much lye - add more
grease (or oil if you are reworking the "green" soap).
If the soap falls from the knife in long ropy pieces, it needs more lye.
The soap is said to be ok, "When it stands transparent (almost clear) on the knife, neither too white nor too ropy". Back to Proving
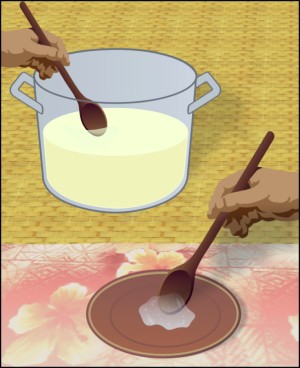
Proving Method B
Take a one inch by one inch (approx 2 x 3 cm) bit of the soap mixture out of the boiling pot, and put on a glass or "fired clay" plate (China plate).
If it cools transparent with whitish streaks and specks it is "done".
If it is grey and weak-looking or has a grey bit around the outside, it needs more lye.
If there is a grey skin over it, more fat needs to be added. Back to Proving
Proving Method C
This method is known as the "ribbon test". It is very useful towards the end of boiling. Take two teaspoons of mixture out of the pot and cool it on a plate.
When cooled, take some of the soap off the plate, and press between the thumb and forefinger. The soap should come out from between your fingers looking like shiny ribbons with dull (opaque) ends, and be clear when held up to the light.
If the cooled bit of mixture comes out from between your fingers in the shape of threads, then there is too much water left in the soap, more boiling down is needed.
If the dull ends of the piece of soap between your fingers, first can be seen then disappear, then the soap is too greasy or oily and needs more lye.
If the soap is grainy, or turbid (all mixed up looking) and a bit whitish, there is probably too much lye, and more grease or oil is needed. Back to Proving
Proving Method -"Tasting"
This is not a main method, and takes some experience to get right.
Taste some cooled soap mixture on the tip of the tongue. A sharp "bite" or "burn" shows that there is too much lye in the soap mixture, While no "bite" at all, shows that there is too much grease stir and/or add more lye.
A good soap should give a little bite on the tongue. Back to Proving
"DONENESS"
Keep boiling the mixture until the froth settles down into the pot.
Large white bubbles will "pop" over the top of the mixture, as if the soap is "talking".
If not sure - then use Proving Method C.
The soap can either now be stored as "soft" (liquid) soap in a wooden, or other "safe container", OR it can be turned into "hard" or solid soap.
"HARD SOAP"
Salt absorbs water, and will attract it more than the soap mixture does. By adding few handfuls to a large mixture, or less to smaller pots, the soap will float on top of the rest of the mixture.
A brownish looking liquid will sink to the right of the pot, and the soap will float on the top.
The method is very much like the last step of"washing" fat adding salt, when making grease. Making Grease
Here as well, the top layer is left to go cold It is then taken (or "skimmed") off the surface of the cold mixture.
Slowly melt it and add a little water (depending on how much "skimmed" soap you have).
Heat this in a safe pot, and after boiling for only a few minutes, add salt again. Leave to cool and then "skim" again.
Now at this point, you may either remelt and colour (and/or add perfumes) to the soap, and pour into moulds to harden and set, (or to improve its quality it may be melted and "re-worked")
"RE-WORKING"
Some of the amount of grease used to "re-work" the soap, can be added as oil. Coconut oil is said to be the best.
The grease being used may be perfumed. (See the section on perfuming. If you are to add perfumed grease at this point, then use more petals in treating the grease when perfuming it).
To the remelted "green" soap, add more grease and or oil, until it is all melted, then add more lye until the mixture has a "bite" or "burn" to its taste.
Continue heating and stirring (not too much stirring) and follow the general method for Soap Making ("proving" and watching for "doneness".) When "done", pour out into moulds and set as described in the next section)
GRATING
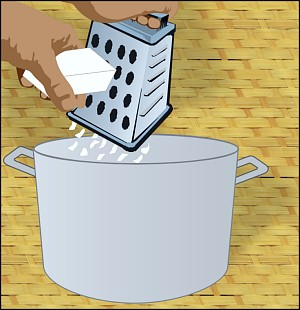
Grating means using sharp metal to break soap up into small thin pieces. Cutting the soap with a sharp knife is ok, but does not do the best job.
PERFUMING & COLOURING
When the soap is melted for the last time before being poured out into moulds, it can be coloured and perfumed. It is best to not do this any earlier in the method, as the lye water could hurt the perfume or colouring. If you have perfumes or colouring things that are safe to eat, try them out on small amounts of soap (split the melted soap in to different safe pots, and try different things out).
There are ways of gathering perfumes from flowers and leaves. The ones used here, put the perfume straight into the grease.
FLOWERS
Pick flowers early in the morning. Choose flowers which have a very strong fragrance (perfume - smell).
You can either "scent" (perfume) all the grease, or only the grease that you are going to use during "re-working". If you are scenting grease to be used during "re-working", double the amount of flowers used.
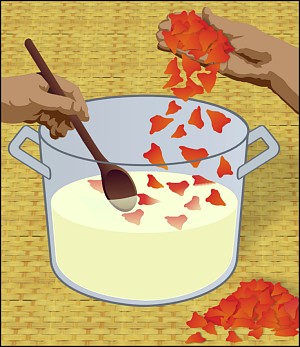 The flowers are put into melted grease, and the mixture is heated
and kept just at melting point for an hour. Leave to harden overnight,
then remelt slowly and strain the flowers out of the melted grease.
For normal perfuming of grease, use one cup of flowers for each
cup of melted grease.
The flowers are put into melted grease, and the mixture is heated
and kept just at melting point for an hour. Leave to harden overnight,
then remelt slowly and strain the flowers out of the melted grease.
For normal perfuming of grease, use one cup of flowers for each
cup of melted grease.
Take all the green bits off the flowers first.
If you wish to use leaves instead of flowers, then you will need twice the number of cups of leaves than you would for flowers. With leaves, it is sometimes helpful to heat them slowly with half the number of cups of water as there are cups of leaves. Heat until the water has all gone away, then add to the grease as for flowers.
SPICE COLOURING
| Spice | Amount In Tablespoons | Kind Of Soap |
|---|---|---|
| Cinnamon | ½ Tbsp | Sandy |
| Paprika | ½ Tbsp | Pinkish |
| Sulphur | 1 Tbsp | So Called Medicated |
| Curry | ½ Tbsp | Brownish |
If You Want to Print The Table At Left
When the soap is being melted for the last time, colouring things can be added. The ones suggested here are quite common, and easy to find.
You can try out your own things but make sure that they are safe to eat first. While making the soap, keep a note of how much grease is used.
When colouring, add the number of table spoons of spice shown for each cup of melted grease or oil which was used. Mix the spice in a little bit of oil.
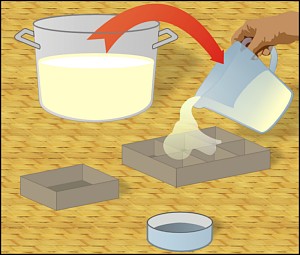
POURING & SETTING
As said in the Information Section earlier, various kinds of moulds can be used to set the soap into.
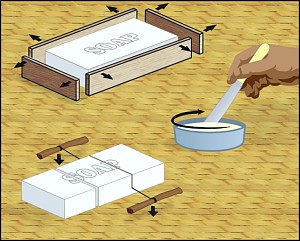
If you decide to use one large wooden container, soak it in water overnight. Empty the water out and line it with wet cloth just before pouring the soap into it.
Leave the soap in the container for between four to five hours (or even overnight) Cover the container with a thick cloth or blanket to stop the heat escaping too quickly.
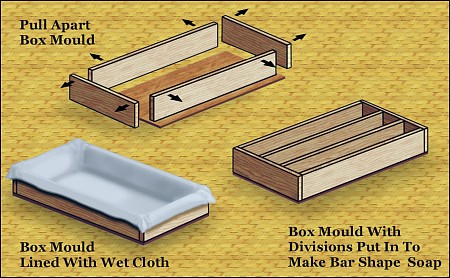
Making a wooden box with sides that can be pulled away, is one of the more successful methods.
Make a bar shaped soap, using wooden divisions inside the setting mould.
Making a bar shaped soap will make it easier to "split" the soap down to useful sizes later on.
If you are using smaller wooden moulds, you can grease the inside surfaces.
BREAKING OUT OF MOULDS & "SPLITTING"
Remember that the soap is "green" and must be handled
carefully.
Use rubber gloves, or grease your hands up a lot when touching the soap at this stage.
When the soap has hardened, remove it from the moulds. If it is already in the shape that you want, then stack it, to air and harden further.
If you want to make it smaller, "split" it using a fine wire, or a strong thin cord. Using a knife will normally chip the soap and make it break up into shapes which are not so useful.
DRYING & AIRING
Leave the soap to air and dry, becoming a lot harder, for about a month. Dry hard soap takes longer to use up.
Stack it in a way that will let as much air get around it as is possible. Keep sunlight and water away!
When the soap is dry and hard you can polish it with a soft cloth, and even wrap it in shiny or "grease proof" paper if you want to.
After using soap, always put it in a clean dry place away from sunlight and metal containers or shelves.
FAILED SOAP
If your soap seems to have gone completely wrong, you will often be able to "recover" it by "grating" and reworking it using more beef grease and lye, and using the "proving" and "doneness" checks.
You would also need to use the salt "graining" method again. This means that if you wish a higher quality soap, you would need to "re-work" the green soap to put back in some of the better qualities again.
If your soap has too much of a bite to it, then you will need to re-work it again as well. This is caused by there still being too much lye left in the soap.
Sometimes the soap will not go hard. Continue boiling it, adding more grease and lye, and using the "proving" and "doneness" checks. THIS EXTRA BOILING CAN TAKE HOURS SOMETIMES.
The whole matter of learning to make soap, has a lot of trial and error in it
Keep on learning!
FURTHER ENQUIRIES
Should you wish to advise us of any improvements that could be made to the contents of these materials, please do E-Mail us or write to the address below, your advice would be greatly appreciated.
These materials have been produced for charitable and educational purposes. It is not the intention of the publishers that they should be used for any commercial purpose. Within those guide-lines, any person may reproduce any of the contents of these materials freely - to the glory of our great God and Saviour the Lord Jesus Christ.
Booklet copies available, from the postal address below as available, (donations appreciated but not sought). Acrobat Reader (PDFs) are available here: http://soap.paulanorman.com
Please freely copy from this site for any non-commercial purpose, but please include my name and E-Mail paul @ paulanorman.com and link http://PaulANorman.com.
Feed back really appreciated! (paul@paulanorman.com).
This Site is http://PaulANorman.com
Illustrations
Russell Abbot (freehand Originals 1989)
Completely Redone to Colour in CorelDraw by:—
Michael F. To'o 2004/ January 2005
Text Assistance
Michael F. To'o
Phillip Keelan
Text
Paul A. Norman
These materials were first published in 1989, under the title "Easy Soap Making."© First edition 1989
Revised as Traditional Soap Making 1996 ISBN 0-473-03925-7 ©
1996
Prepared for Internet Explorer 6 and for Republication 2004/ January 2005
- Soap C/- Paul A. Norman
P O Box 1005
NELSON
New Zealand.
Index
(Not complete yet)Coconut: Oil, at the Reworking Stage
Colouring Information, Colouring Spices
Flowers.
"Soft" Water, Spice Colouring, Splitting Information, Splitting.